1. Navigate to www.flashtrakrtl.com. From the home page, enter your User Name and Password
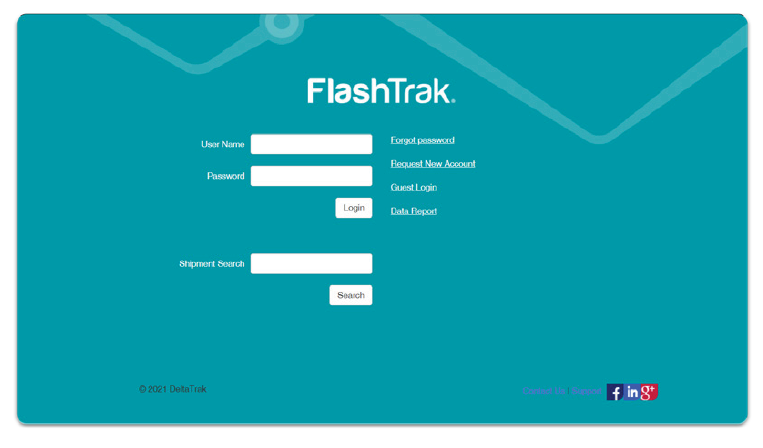 Click on the Login button.
2. Add and Edit Users
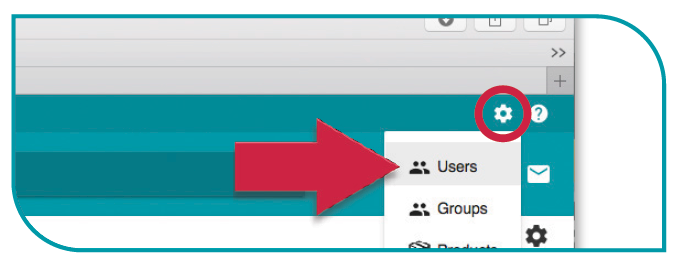
2.1 From the Dashboard page click the white sprocket in the top right corner and select Users.
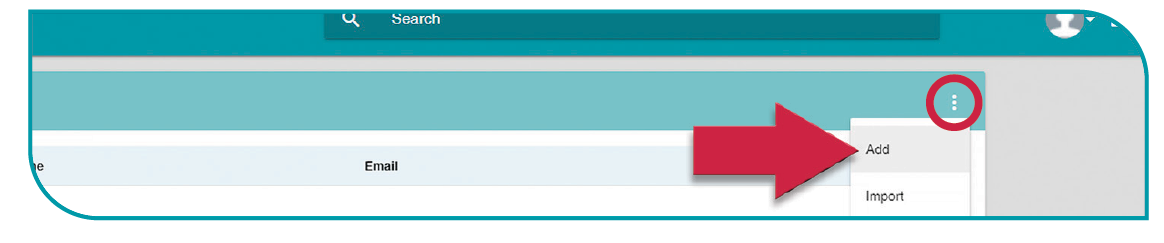
2.2 This will open the Users page.To add a new user click the ellipsisin the top right corner and select Add.
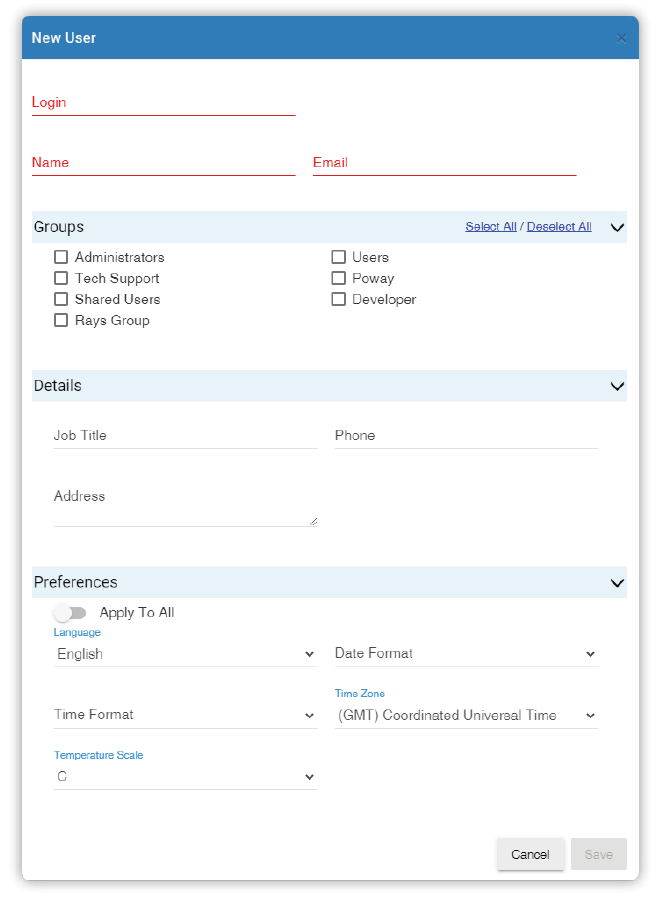
2.3 In the New Userwindow, enter the Loginname (default is first initial, last name), enter user’s first and last Name and Email Address.
- Click on the box to assign the type of user being added, choose from Administrator. Administrators have the ability to edit, users can only view.
- This section is optional. Complete job title, phone number and address.
- From the drop down menu in each field, select the preferred language, date and time format, time zone and temperature scale.
2.4 When all fields are complete,click the SAVE button. The user has now been added and will receive a confirmation email from [email protected]. From the email, the new user must follow the link to the home page and activate their account.

3.Add and Edit Groups
This task should only be used by administrators. This gives administrators the ability to create or edit groups (i.e. admin or user).
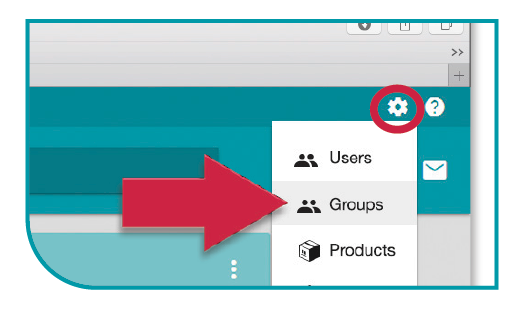
3.1 From the Dashboard page click the white sprocketin the top right corner and selectGroups.
3.2 This will open the Groups page. To add new groups, click the ellipsis in the top right corner and select Add.Assign a name, click enable and choose settings. To edit existing groups click the preferred names and change the attributes. Use trash can to delete groups. For further instructions please contact the IT department.

4. Add and Edit Products
Products are used to assign logger attributes, specifically out of range alarms. Create product for each commodity being shipped. (i.e. if you ship ice cream and milk, create a product for the ice cream truck and another for the milk truck. 1 for frozen items and 1 for refrigerated items)
4.1 From the Dashboard page click thewhite sprocket and then click Products.
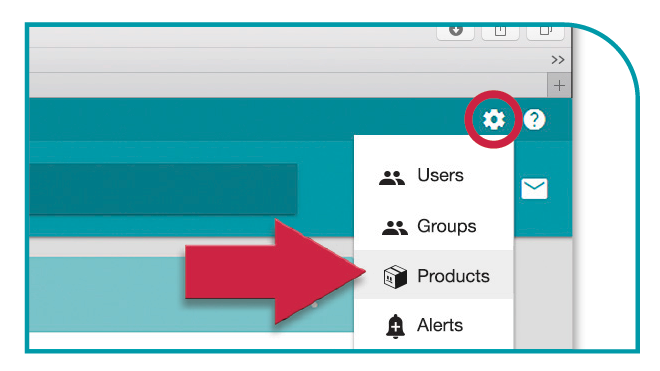
4.2 To create a new Product click the ellipsis at top right corner and select Add. To edit an existing Product, click the Product name and the edit screen will open.
4.3 This will open the New Product screen. Assign the product a Name, click the enable button. Click default if appropriate.
The following optional selections are available:
- Shelf Life Profile
- MKT Activation Energy
- and assign an Emulation Coefficient
For more information on these settings please contact tech services or your salesperson. The notes tab can be used to indicate a short definition or name as needed.
4.4
The next setting is the Test Data Range. This setting allows the user to set an alarm delay at the start of the trip, giving the logger time to acclimate to the proper temperature. A 30-45 minute alarm delay is suggested. Click the Start field and enter a value. Recording will start immediately upon activation. Only the alarm will be delayed. Setting an alarm delay at the end of the trip will allow time for trailer unloading. Click the End field and enter a value.

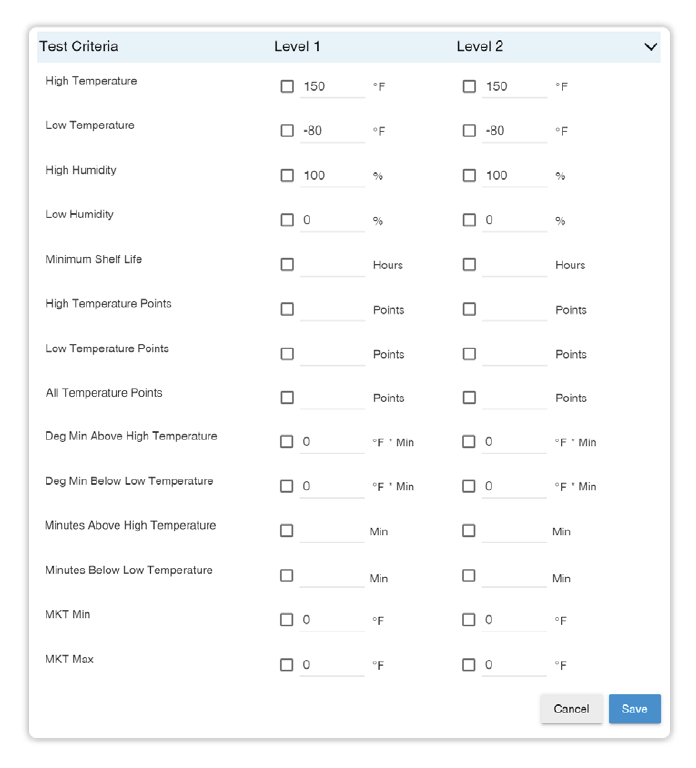
4.5 The last setting is TesT Criteria Level 1 and Level 2 A Level 1 alarm is a warning that the temperature is approaching out- of-range status. A Level 2 alarm should be set at a higher point. This alarm indicates actual out-of- range status. When the edit screen is first opened, the boxes are unchecked. Select the criterion by checking the box, and enter a value.Note that when setting multiple criterion the first value to be reached will trigger an alarm. For example, if the preference is to trigger an alarm when the temperature has been above the high temperature for a specified time select “Minutes Above High Temperature” instead of the “High Temperature” alarm.
5. Edit and Create Alerts
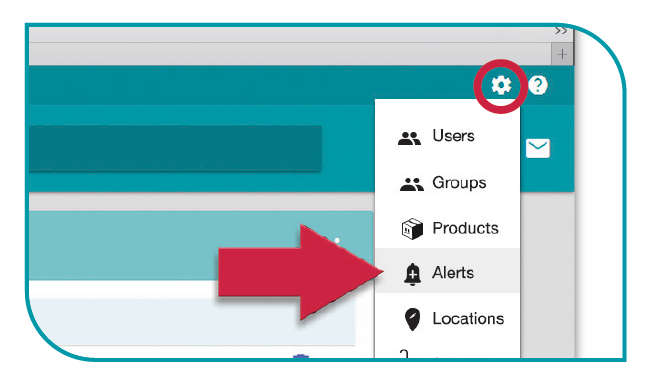
5.1 Alerts are used to notify the user of Product alarm conditions. From the Dashboard page, click the white sprocket and select Alerts.
5.2
5.2.1 Enable alerts by group:Administrators, Shared Users or regular Users. After selecting the group, click Enable. Email alerts are sent upon activation or termination of a trip. At the Shipment Status tab, click Activation and/or Termination.
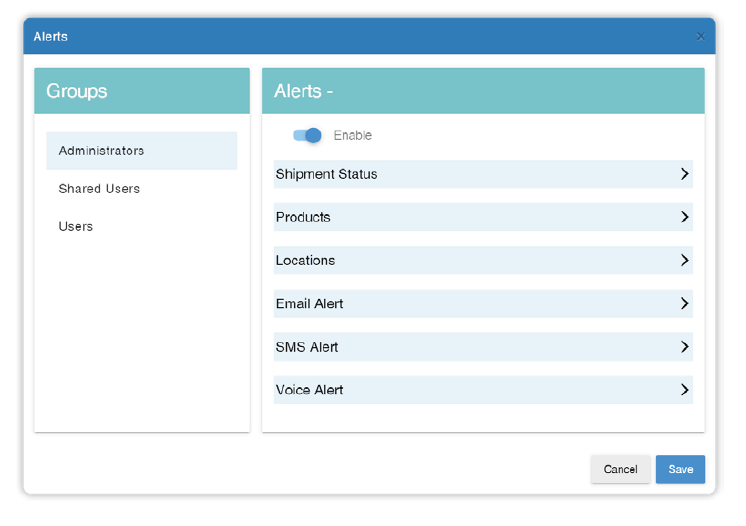
5.2.2 The Products tab allows users to select alerts based on product type. The Location tab allows
users to set up geofence alerts for notification of product departure or arrival. To select location, place a check mark in the box. Select Entry (arrival) or Exit (departure). The On-Time tab allows for setup alerts based on expected and actual dates for Device deployment & completion. And/or for alerts based on our Maritime departure and arrival dates (when used with our Maritime tracking system).
5.2.3 The last three tabs allow users to select how they wish to receive alert: Email, SMS, or Voice. For Email, click the tab, then Enable. In the Message field, create the email message which will be sent. All Administrators will receive email message. Other user groups may be added under the Additional Emails tab. (SMS and Voice alerts must be activated by Technical Support before enabling.) Click Save once all selections have been made.
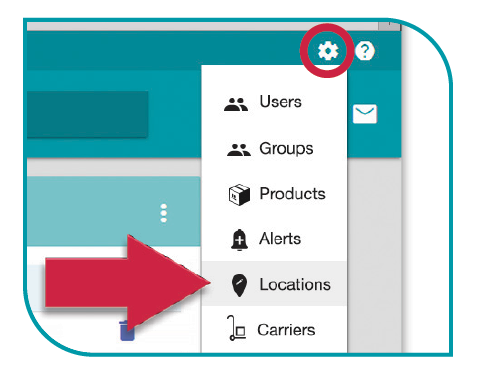
6. Edit and Add Locations
The Locations tab allows users to enter shipper and receiver information. Once entered, this information is available for selection when setting up shipments.
:6.1 From the Dashboard click the white sprocket () and select Location.
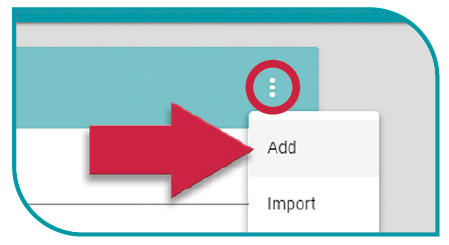
6.2 To create a Location, click the ellipsis and then add. To edit an existing Location, click the name.
6.3 Enter the location name and choose Shipper or Receiver. Enter the Address and click Verify. The program uses Google Maps to locate the address and autofill the Latitude and
Longitude. Verify the location on the map and click Save. The program will save all locations created. The Geo-Fence can be altered here by entering a value and selecting the unit (meters or feet). The default is 100 kilometers. The recommended Geo Fence size is 5KM.
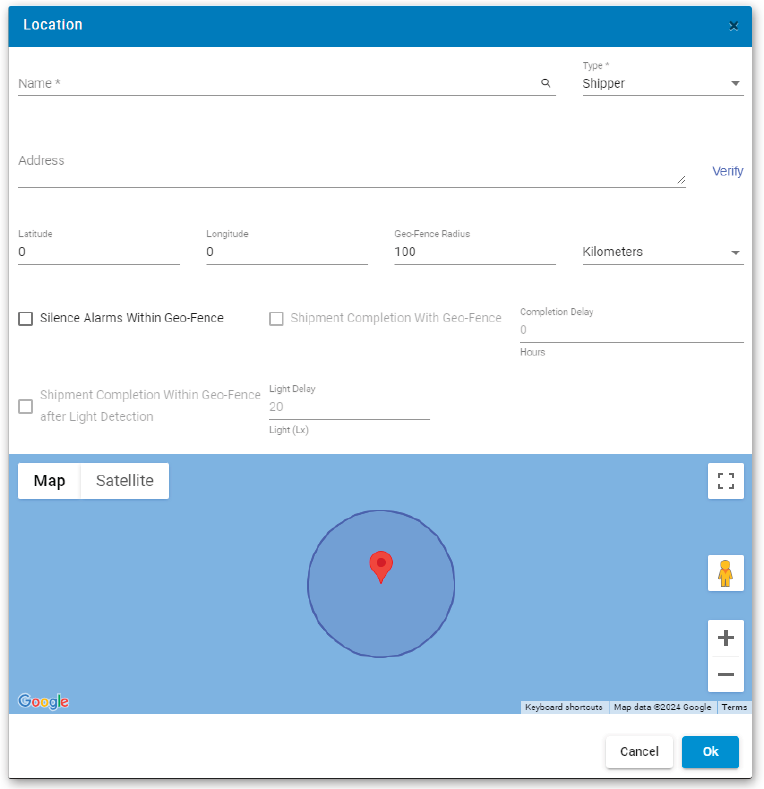
Silence Alarms Within Geo- Fence:When this feature is enabled, no alerts will be sent while the device is in this Geo-Fence. This can be useful to avoid alerts while the device is at the origin.
Shipment Completion with Geo-Fence: Enabling this feature will automatically complete a shipment if the device arrives in this Geo-Fence. This location must be set as the Receiver for the shipment to complete.
If the delay is set higher than 0 (1 or more hours), then a delay will start when the device arrives in this geo-fence if the Completion setting is enabled. After arriving in the geo-fence, the shipment will wait for the specified delay time before completion.
Shipment Completion Within Geo-Fence after Light Detection & Light Delay: Enabling this feature will automatically complete a shipment if the device arrives in this Geo-Fence and a light value has been detected by the device. This location must be set as the Receiver for the shipment to complete. The light sensor must detect a value over the set amount in Lx.
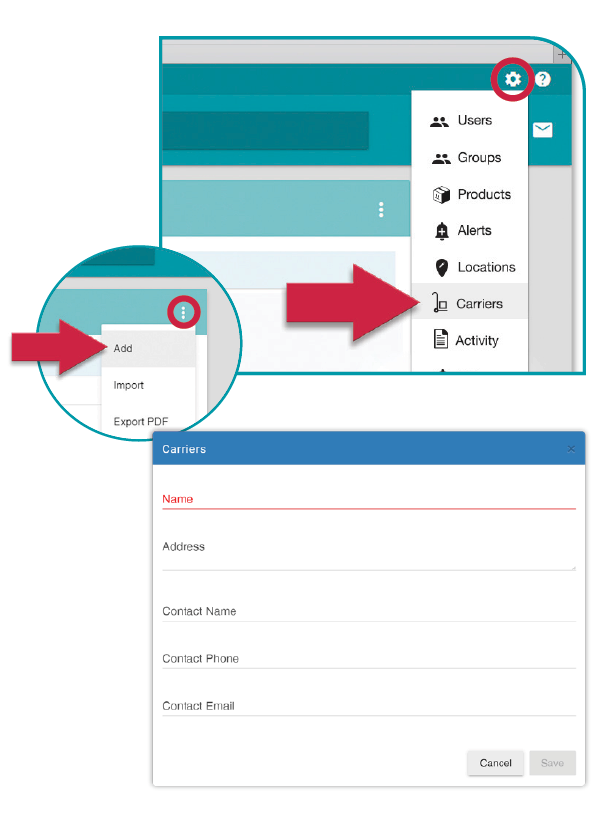
7. Edit and Add Carriers
The Carriers tab works the same way as the Locations tab. This allows the user to track the carriers, and stores all pertinent carrier
7.1 From the Dashboard page click on the white sprocket () in the top right corner and select the Carriers tab.
7.2 To add a new carrier click the ellipsis and select Add. To edit an existing carrier click on the name.
7.3 This will open the edit carrier box. Enter the information and click Save. The system will store carrier the information for ease in setting up shipments
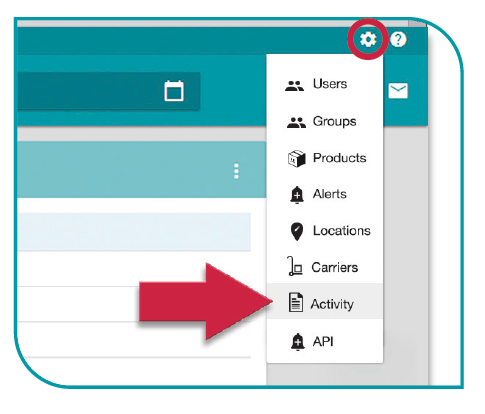
8.View Activity
The Activity tab allows the administrator to audit the actions of all users. To access the Activity tab click the white sprocket and select Activity.
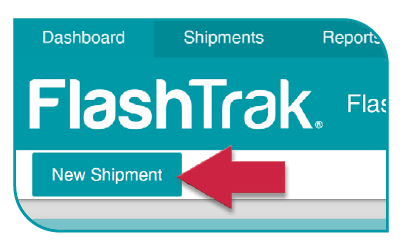
9. Create Shipments
9.1 A shipment can be created two ways. Method #1: Turn on the device by pressing the Start button for 10 seconds. The device will switch from Inventory mode to Active Shipment status. Follow the instructions in step 11 to edit the shipment. (All units shipped after 2/6/2019 will show on the customer’s inventory setup.
9.2 The second method is to click the new shipment tab which is located in the upper left corner of the Dashboard page.
9.3 The New Shipment tab will open. All loggers in the inventory are listed in a dropdown list. Edit the fields and click Save to
create the shipment. Press Start to begin logging the shipment.
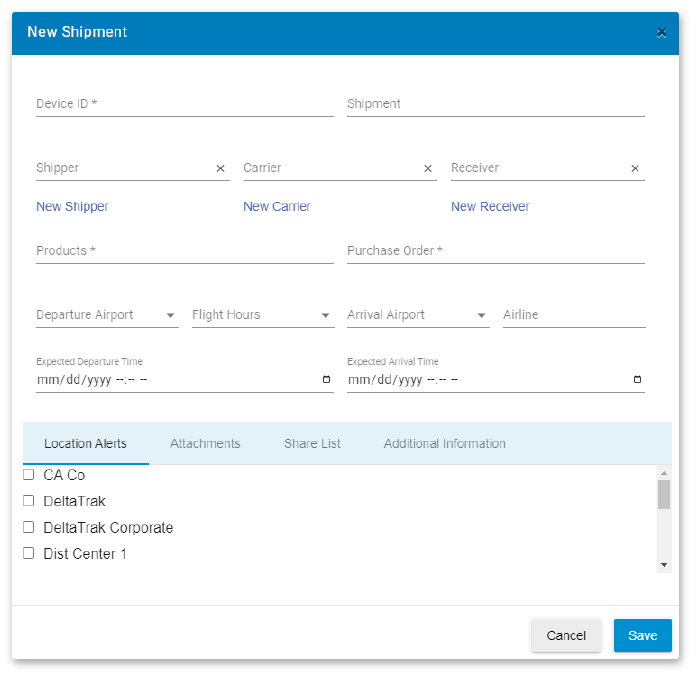
- Device ID – This field is a dropdown list of all available loggers in the customer’s inventory.
- Shipment – This field can be changed to something meaningful to the user. (i.e. Bill of Lading number) Use whatever term is used to identify the load. If no Shipment ID is entered it will be defaulted to the Device ID.
- Shipper – Select a shipper from the dropdown list of shipper Locations created by the user. If user is part of a group with permissions to “Create or Edit Locations”, click New Shipper and add a new shipper location to the
- Products Alerts Tab – Select a Product from the drop-down list to set alarm criteria. Data will be analyzed for Pass / Fail criteria based on the Product selected.
- Receiver – Select a Receiver from the dropdown list of receiver Locations created by user. If the user is part of a group with permissions to “Create or Edit Locations”, click New Receiver and add a new shipper location to the list.
- Carrier – Select a Carrier from the dropdown list of receiver Carriers created by the user. If the user is part of a group with permissions to “Create or Edit Locations”, click New Carrier and add a new shipper location to the list.
- Departure Time – Enter a departure time.
- Expected Arrival Time – Enter an expected arrival Time.
- Location Alerts Tab – Select a location to trigger geofence on arrival or departure. Multiple locations can be selected for a shipment.
- Attachments Tab - Documents and Photos can be added as needed, Click the attach button and select file to be added.
- Share List Tab – Enter an Email address and click the add button. An email will be sent to the recipient allowing access to the data for this logger only.
- Additional Information Tab – Information such as Tractor ID, Plate #, License Plate, Driver Name, Driver License, Driver Phone and Comment Field can be entered here.
10. Edit Shipments
10.1 Select the shipment to edit by choosing the logger device ID from the Active Shipments box on the Dashboard page. Click the pencil
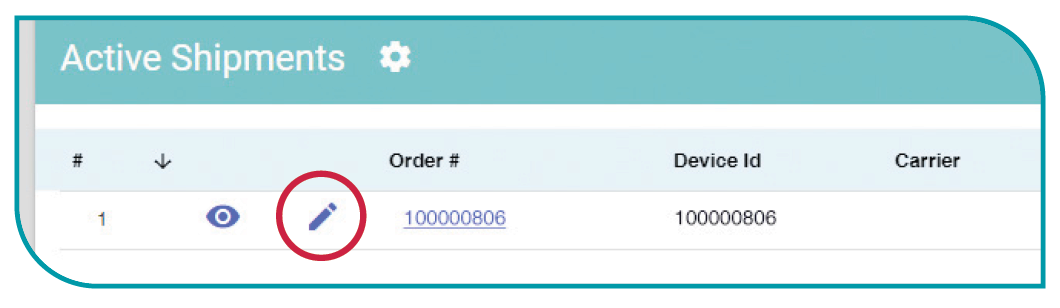
10.2 This will open the Edit Shipment Tab.
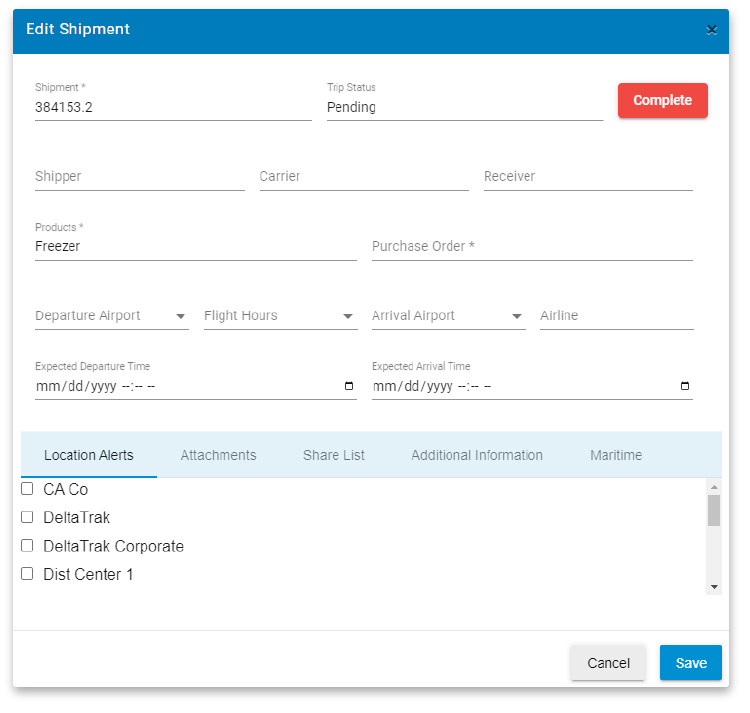 Make changes as necessary to the shipment and when all fields have been entered. Click Save to complete setup process.
Note – All fields are optional, make as few or as many changes as required. The product field cannot be changed after the logger has been started. Editing the shipment does not start the logger. The logger will start when the button is pressed and the green light flashes.
Trip Status – tab has 2 options, Active or Complete. To complete a shipment change the field to completed by clicking the “Complete” button. This step is irreversible so use care when selecting this field.
11. View Active Shipments – Data
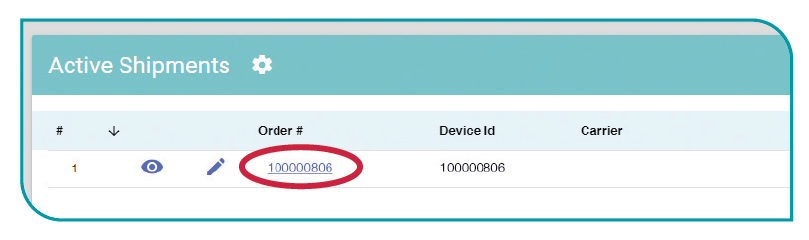
11.1 Shipments in progress where the button has been pressed will display an eyeball on the Active Shipments tab. The map will also display an icon showing the location of the device at the current time.
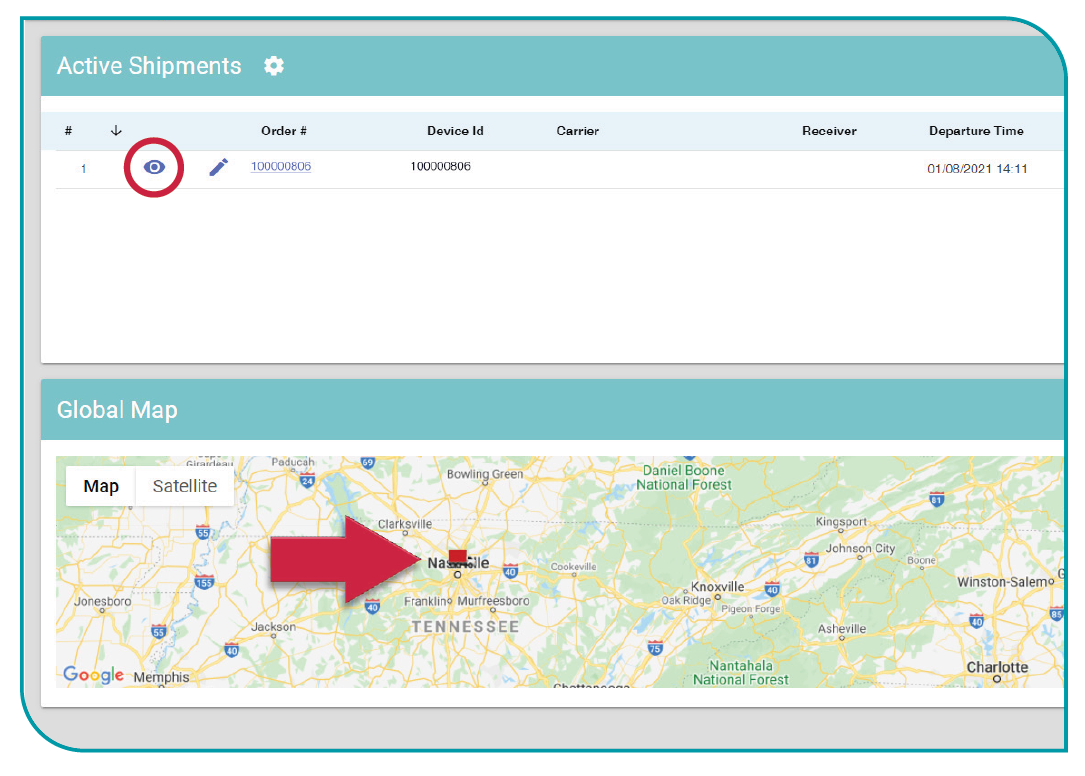
11.2 On the Dashboard page, under Active Shipments, select the logger you would like to view and click the Shipment ID. This will open the Shipment Details Page.
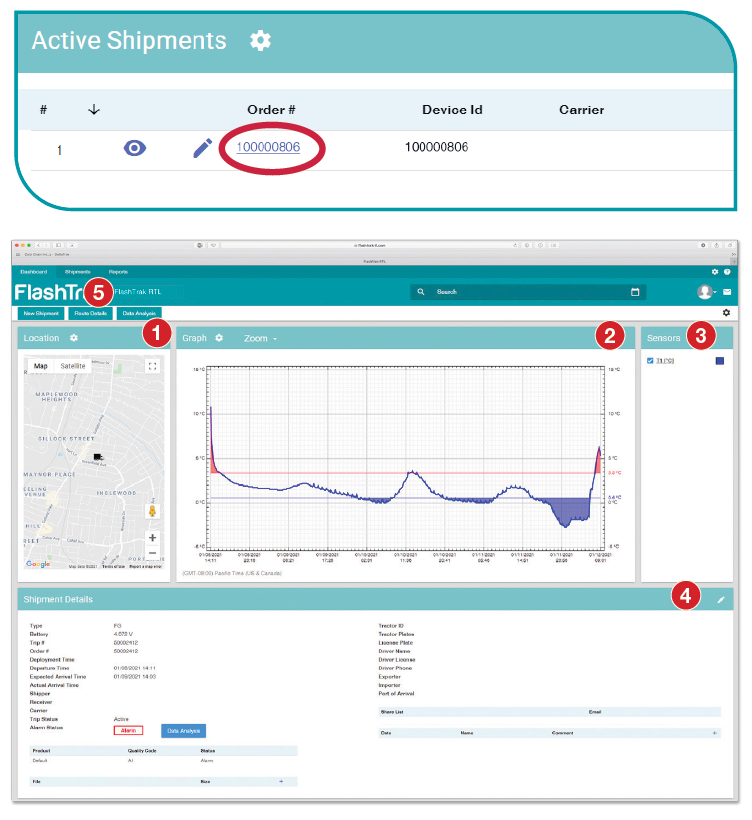
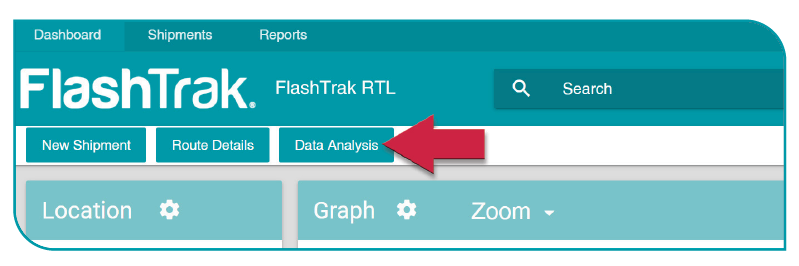
- Location – This box displays a map with the current location of the device.
- Graph – This will display the Temperature or Humidity Graph for the entire trip.
- Sensors – This controls which sensor will be visible on the graph. T1 Temperature RH Humidity.
- Shipment Details – This box gives a recap on all settings assigned to this logger.
- Route Details – This button will open the map and display the route taken by the logging device.
11.3 Data Analysis - This button opens the Data Analysis Page.
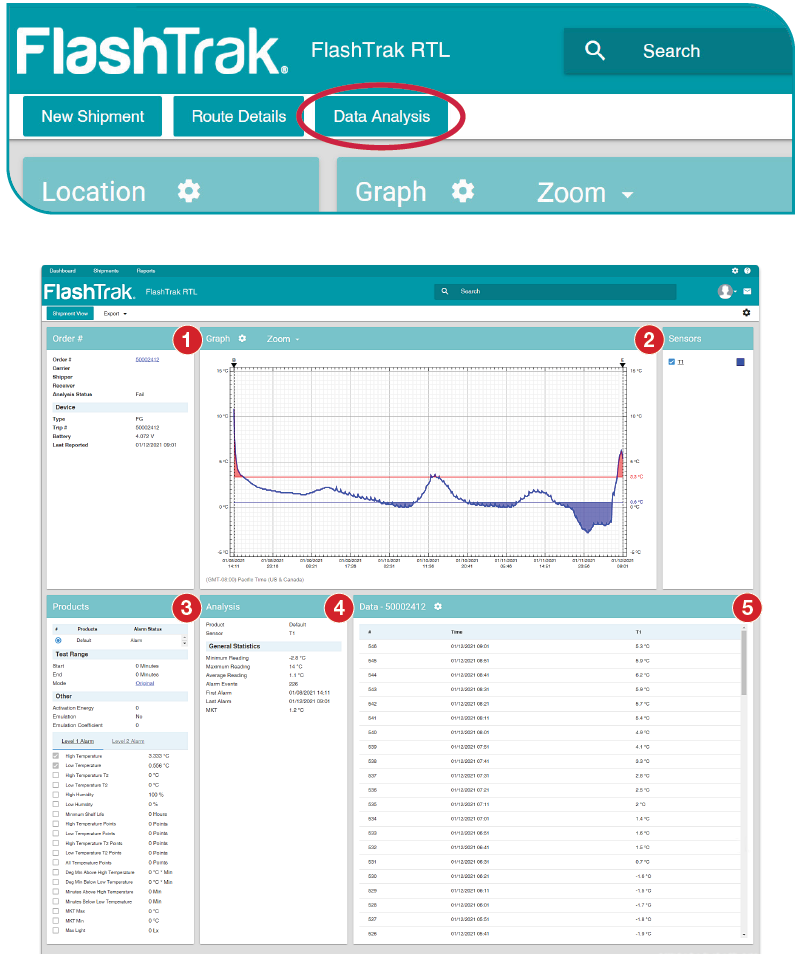
- 1. Shipment – Displays current status of device..
- 2. Graph and Sensors – Displays the current Temp or Humidity.
- 3. Products – Displays Product settings assigned to this logger.
- 4. Analysis – Displays General Statistics for this shipment. (High, Low, Average)
- 5. Data – Displays the historical data recorded by the logger.
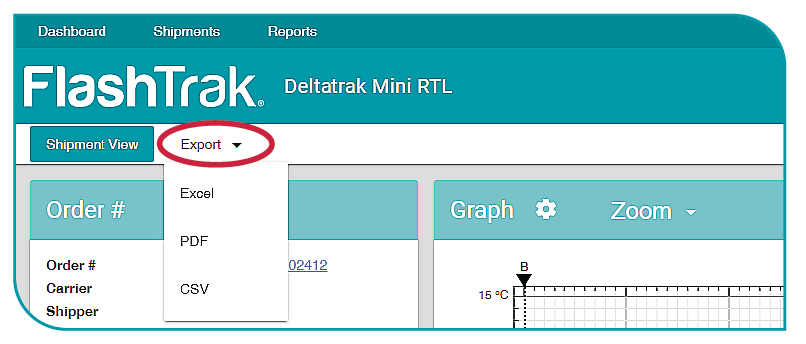
12. Download Data Report
12.1 Select the shipment ID.
12.2 Click the Data Analysisbutton.
12.3 Click the Export Button. Select Excel, PDF, or CSV. The report will be generated and displayed on the screen. Select download and save to your computer.
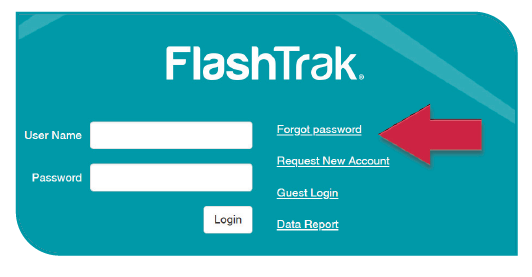
13.Reset Password
To request a new password, click on “Forgot Password” then enter the email associated with the user. An email with a link to reset your password will be sent to user.
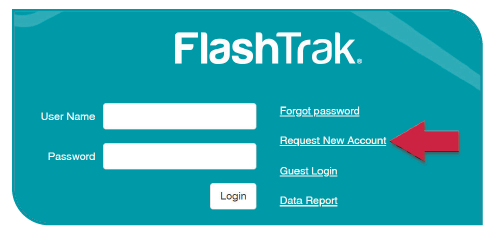
14. Request a New Account
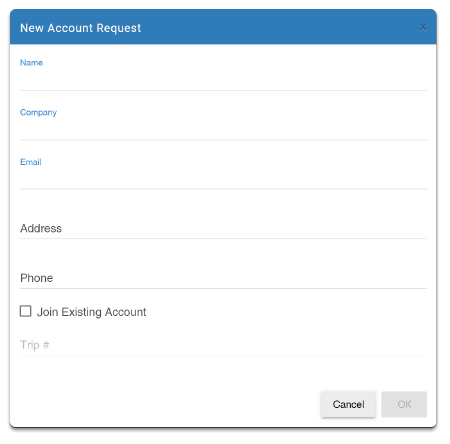
14.1 To request a new company account on FlashTrakRTL. com from the main login page click “Request New Account”. This will open the “New Account Request” page.
14.2 Enter the required information.(Name and email are mandatory fields) Click OK. A DeltaTrak representative will contact you to complete the account activation.
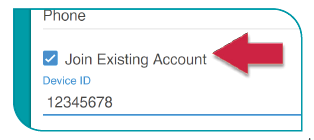
14.3 If you have a DeltaTrak RTL device and want to request a user on the account
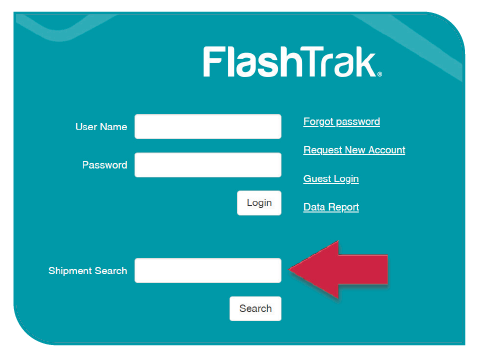
15. View Data Anonymously
If the company has chosen to allow anonymous access to their data, the shipment can be accessed by entering the Device ID in the “Shipment Search” field and clicking “Search”. If the shipment is found, the user will be logged on as an anonymous user and data for that shipment will be available.
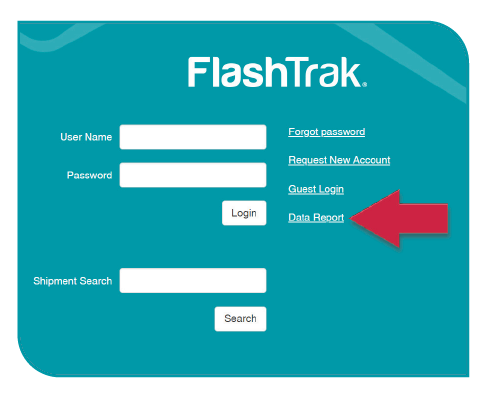
If anonymous access is not enabled, the temperature record my be accessed in a simpledata report. Click on “Data Report” then enter the user’s email address and the Device ID of the logger. You will receive an email with a link to the data report with be sent to the user. This report will contain only the time and temperature data in a PDF file.
16. Troubleshooting
Contact Tech Support:
Phone: 925-249-2250 Ext 5120 Toll Free 800-962-6776 US & Canada
Email: [email protected]